How to Disable and Enable or Pause Windows 10 Automatic Updates
You can either pause or completely stop automatic updates in Windows 10. Also shown is how to restart Windows Updates when you are ready. Read on below to decide which you want to do, or click the in-page jump in the introduction below to go straight to it.
Introduction to How to Stop and Restart or Pause Windows 10 Automatic Updates
Working from home is very topical right now, with many companies encouraging or requiring it to reduce exposure to and spread of viruses in the office (particularly the current coronavirus, covid-19).
You may want to pause Windows auto-updates in order to prevent a download to reduce bandwidth.
You may need to stop Automatic Windows Updates to prevent the restart of your PC or laptop which can play havoc with your files and open apps.
Did you know you can pause the updates for up to 35 days (in most cases)?
Windows 10 wasn’t provided with an option to turn off updates altogether unlike Windows 7 and 8.
However, you can stop them altogether, even in Windows 10 and I’ll show you how.
How to choose whether to stop or pause Windows 10 Automatic Updates
Disable Windows Update Service to Stop Automatic Windows 10 Updates
Enable Windows Update Service to Start Automatic Windows 10 Updates
Pause Windows 10 Auto-Updates via Settings
How to restart Paused updates in Windows 10 immediately
Points below help you decide which is for you. Once you have done what you need, you can restart updates or turn off pausing the updates, and these steps are also shown.
How to choose whether to stop or pause Windows 10 Automatic Updates
If you are not sure whether you want to stop or pause, perhaps consider that pausing Windows updates is a recommended method, built into Windows 10.
That is why it is easily accessible from Settings within Windows.
Even so, I show you a method to stop Windows 10 Automatic Updates completely (it cannot reasonably be done via Settings).
Pausing Windows 10 updates can only be set for a limited amount of time (or rather, days).
Note: high security-related updates can’t be paused.
- If you need longer than the allowable option, you might want to stop it altogether and restart it when you are ready.
- One advantage to Pause rather than stop Windows automatic updates is that the method to stop presented below might require a restart of your PC.
This this might take you a long time and be inconvenient.
- Another possible issue is it potentially could stop other programs’ automatic updates too.
Or is that a bonus?!
If you are in the middle of some work, the best option is probably just to pause the updates for now.
Note: If you want to download and install updates to Windows 10 manually, see this article.
Disable Windows Update Service to Stop Automatic Windows 10 Updates
If you want to do more than just pause automatic Windows updates, you need to stop the Update Service built in to Windows. This will turn off Windows updates rather than pausing them.
Here’s how you do it:
Step 1 – Start the windows app that runs files
Type ‘Run’ in the Windows search bar.
Or use the shortcut by pressing the <Windows> and <r> keys at the same time.
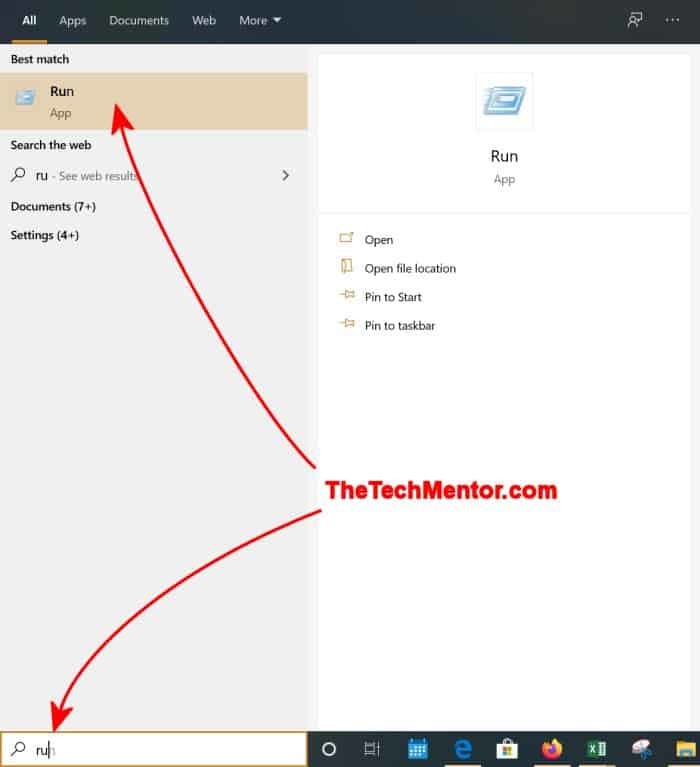
To stop windows 10 automatic updates, first start the run app.
Step 2 – Locate Windows Services running on your computer
The file to run is an extension to locate the services running on your computer, a file called ‘services.msc’ (msc is for Microsoft Saved Console files).
A new window will open showing all the services available.
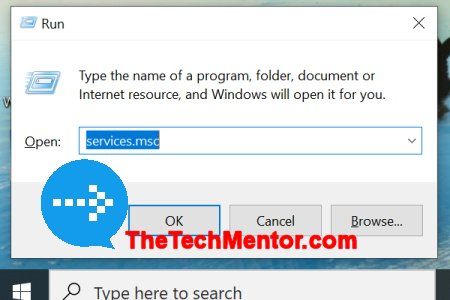
Services.msc will open showing all the services available.
Step 3 – Find and open Windows Update
As it is a long list and we are looking for ‘Windows Update’, click ‘Name’ to sort in reverse order to bring the one we want towards the top of the list.
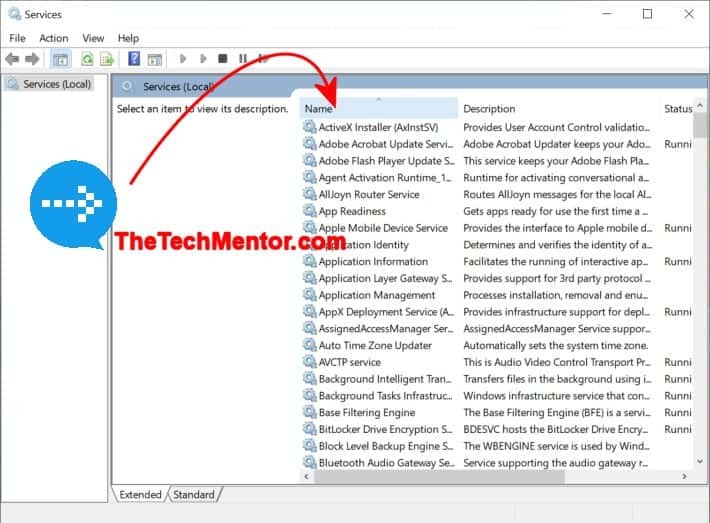
To stop Windows 10 updates altogether we need Windows Services, click the Name header to bring it near the top of the list.
Select the ‘Windows Update’ service and press enter, or double click it to open the settings window.
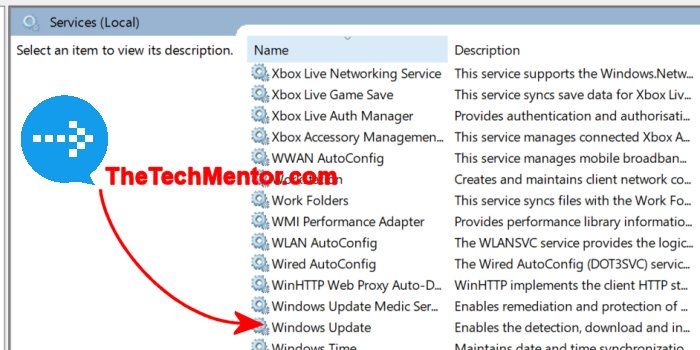
Find and click Windows Update so you can modify its settings.
Step 4 – Select Disabled for Startup
If you want to know more about it before you disable it, you can read in the description box:
“Enables the detection, download and installation of updates for Windows and other programs.
If this service is disabled, users of this computer will not be able to use Windows Update or its automatic updating feature, and programs will not be able to use the Windows Update Agent (WUA) API.”
Find ‘Startup type’ in the middle of the window, and select ‘disabled’ by clicking on the little drop down arrow at the end of the row.
Click the ‘Apply’ button bottom right then ‘OK’.
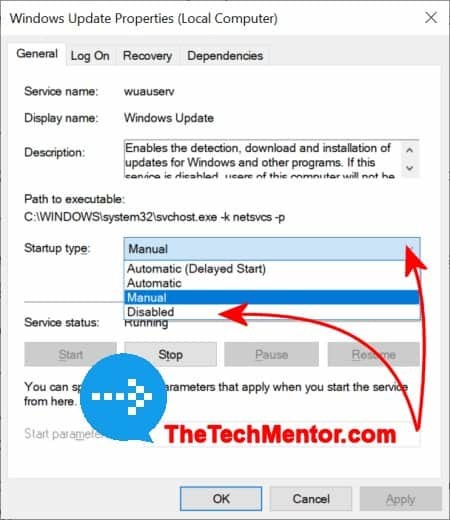
Disable Windows 10 Updates by disabling the Windows Update service (a.k.a. wuauserv).
Step 5 – Restart
When convenient, make sure all of your files are saved and closed. Restart your PC or laptop to take effect.
Admittedly, this is not the sort of thing you can do at the last minute when you have many files open and don’t want to restart just yet.
You can alternatively click the stop button under ‘Service Status’.
I’d still suggest a restart though.
From then on, you won’t receive Automatic Updates in your Windows 10 installation.
Alternative – Metered Connection Method in Settings
An alternative option is to set a Metered Connection for your normal channel to the internet, which should prevent it from downloading updates for Windows and other apps (the intent is to not cost you on the metered connection).
It is kind of a work around though, it might restrict other usage that you don’t want restricted, and doesn’t work for preventing OneDrive from syncing.
Step 1 – Go to Networking & Internet.
Go to Settings (as above) then ‘Networking & Internet’. You can use the shortcut <windows> and <i> keys to get started.
Step 2 – Select your connection method
Select your connection method (such as wifi or Ethernet) on the left then your connection system on the right.
This will open a new screen in the same window for that device.
Step 3 – Set as metered connection
Look down the list for ‘Metered connection’ and below that ‘Set as metered connection’.
Step 4 – Turn off Windows Updates auto-downloads by defining your internet connection as metered
Click or tap to move the selector button to ‘On’.
You can just close the window.
How to undo it?
To remove this restriction, do the same as above and instead select ‘Off’.
Enable Windows Update Service to turn on Automatic Windows 10 Updates
To turn on Windows Update Service, you need to select Automatic (delayed start) or Automatic (or manual, if you prefer) windows Update Service.
I set it out step by step below.
This is similar to the above steps (so you can refer to the above screen copies if you get lost) with the appropriate change to Windows Update Service at the end.
Step 1 – Start the windows app that runs files
Type ‘Run’ in the Windows search bar or use the shortcut <Windows> + <r> keys.
Step 2 – Locate Windows Services running on your computer
The file to run is an extension to locate the services running on your computer, a file called ‘services.msc’(the extension msc is for Microsoft Saved Console files).
A new window will open showing all the services available.
Step 3 – Find and open Windows Update
Your list will probably be in alphabetical order A to Z.
Find and select the ‘Windows Update’ service and press enter, or double click on it to open a window with all the settings options.
Step 4 – Select Disabled for Startup
Find ‘Startup’ and select ‘Automatic (delayed start)’ or ‘Automatic’ (or Manual, if you prefer).
Click the ‘Apply’ button bottom right then ‘OK’.
Step 5 – Restart
When convenient, make sure all your files are saved and closed. Restart your PC or laptop for it to take effect.
Alternatively, if not running, you can click the ‘Start’ button under ‘Service Status’ to turn it on.
From then on, you will receive Automatic Updates in your Windows 10 installation.
Pause Windows 10 Auto-Updates via Settings
You can pause Windows 10 Updates for up to 35 days in most cases, via Windows’ ‘Update and Security’ Settings.
To do it, follow the steps below.
Step 1 – Open Windows Settings
Start to type Settings in the Windows search box.
Likely before you finish more than ‘set’ the ‘Settings app’ will come up as the best match option.
Press enter, click or tap on the Settings app. shown.
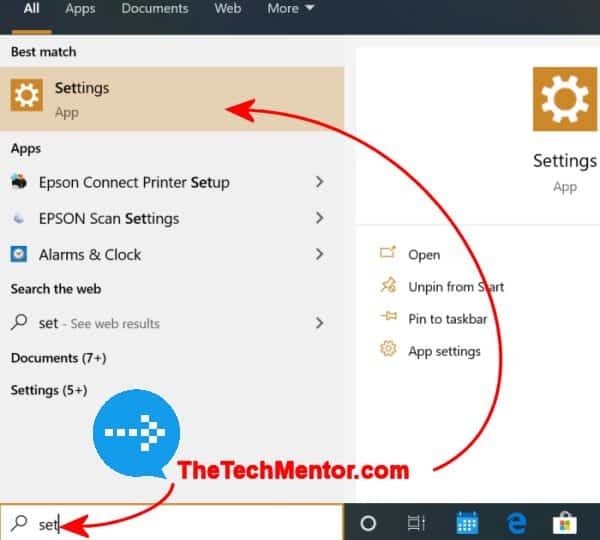
Go to your Windows Settings.
Step 2 – Open Update and Security settings
Look down towards the end of the list of settings for ‘Update and Security’. Click or tap on that to go there.
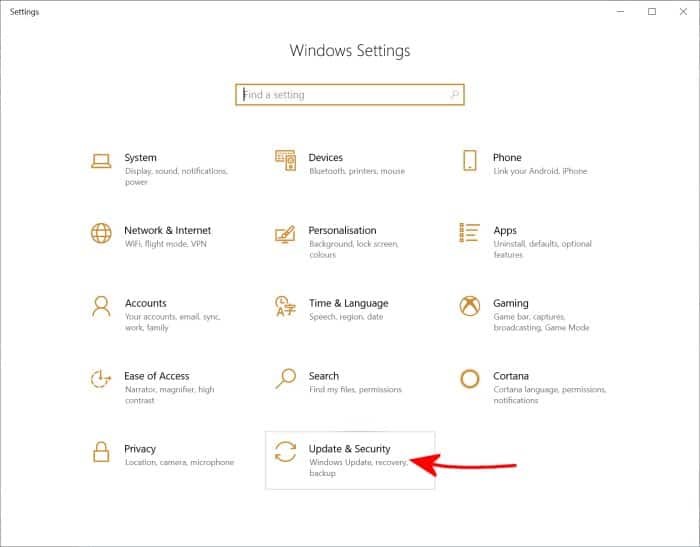
At the end of the Settings list is Update & Security, which we need to access to pause automatic downloads and updates in Windows
This will show you a screen like the one shown below, and may indicate that your device is currently up to date.
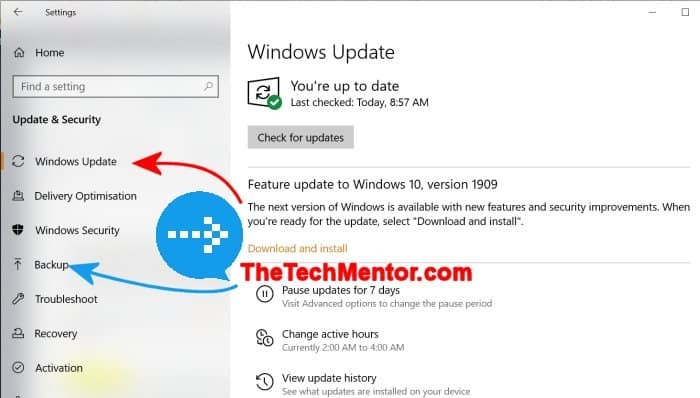
Windows Update in Settings – where you can pause the automatic updates
Side Note: This is a handy region of Windows settings to get to know and can be very helpful. Although we now need ‘Windows Update’ settings (visible at the top left), the settings for ‘Backup’ can be accessed a little further down.
I’m afraid I bore everyone by always telling people at any opportunity to set up an automatic backup.
To do that, go in there and turn on ‘Back up using File History’. You will likely need an attached external hard drive. For more on that see this article.
The most popular articles on TheTechMentor.com relate to how to restore deleted files so we know what we are talking about when we say too many people suffer from losing their files without having a backup.
Okay, now I’ve bored you as well (and you have made a mental note to come back to TheTechMentor.com to easily automate your backups), let’s continue.
Step 3 – Pause Updates
Click or tap on the ‘Pause updates for 7 days’ row.
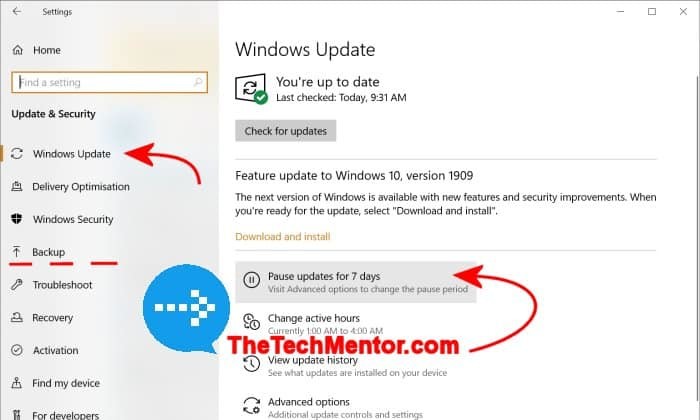
Pause Windows updates for 7 days by tapping or clicking where shown.
It now shows ‘Updates Paused’ at the top and the text where you just clicked has changed slightly to ‘Pause updates for 7 more days’. (Emphasis added.)
This indicates you can pause again for a further 7 days.
Note: If you are a ‘Windows Insider’ you will not get the option to extend the pause past 7 days.
So once you have extended the first 7 days block you get the option to further extend it.
You can tap on the ‘Pause updates for 7 more days’ row again and so on until you have extended the pause period for maximum of 35 days.
Note: Alternatively, you can tap or click on ‘Advanced options’ (shown near the bottom of the image) below the pause row.
This will show a drop down selector to choose a specific date (any date up to 35 days for most people).
Updates will recommence automatically from your selected date.
You don’t have to remember to do anything!
How to Restart Paused updates in Windows 10 immediately
You do not have to wait until a previously selected date to recommence Windows updates.
You can turn off Pause Updates just as easily as pausing them in the first place. If you get lost, you can view the screen copies from above while you read the steps presented here.
Here is how to restart paused Automatic updates immediately step by step:
Step 1 – Open Windows Settings
Start to type ‘Settings’ in the search box.
Watch as you type.
By the time you have ‘set’ typed, the ‘Settings app’ will probably already come up as the best match option.
Press enter, or you can tap or click on the Settings app.
Step 2 – Open Update and Security settings
Look down towards the end of the list of settings for ‘Update and Security’. Click or tap on it to show the settings options.
This will show you that Automatic Windows updates are paused.
Step 3 – Resume Updates to Turn off Pause Updates
Below the notification showing updates are paused, is ‘Resume Updates’.
Click or tap on the ‘Resume updates’.
Updates can automatically occur once again.
Why Pause Windows Updates?
Pausing Windows 10 Automatic Updates generally makes sense so that the updates will not occur now yet will recommence some days later without you needing to remember to take action to turn them back on.
- It could be changed function of Windows you are concerned about.
- There could be interesting new features you shouldn’t take the time to read about right now. Especially if newly working from home – you need to focus!
- It might be the downloading of the update using your bandwidth you are concerned about, making your system slower.
- Potentially it is the related restart and potential loss of files and internet browser tabs you want to avoid.
- You might have set your ‘Active hours’ but you just can’t afford to have it restart while you sleep because you need everything there to get straight back to work in the morning when you wake up.
- You might need to fix Windows Updates error 0x80070002 Windows 10 (or 80070002 Windows 7). See that link for several solutions.
Even if your work is finished you might just want to return to it later to review it with clear eyes and fresh mind.
If it is late in your workday and you don’t want to take the time to work out what you must rename to save without overwriting original files, bookmark or save open website pages and so-on.
Just pause the updates so you can rest easy!
Then you can get straight back to work quickly.
Conclusion
I’ve shown you how to completely stop automatic updates in Windows 10, and restart them again later. I’ve also shown how to pause automatic updates in Windows 10 and how you can restart them immediately when you desire. Also presented are a few points to help you decide which you want to do.

Leave A Response