How to Recover Permanently Deleted Files Without Paying a Pro!
If you’re wondering how you can recover permanently deleted files, and you’re not a computer tech then there may be a part of you that thinks it’s impossible. However depending on what has transpired with your computer it’s worth a shot, and with this article it could be easier than you think. If you’re highly efficient in emptying out the recycling bin regularly, you may now face the problem of having accidentally deleted some precious files, permanently. Luckily, there are ways that you can salvage your hard work.
Some friends of mine love to hit the <Shift> key and <Delete> key at the same time, which also permanently deletes files. If not, you may have accidentally hit the delete button on an important file that you weren’t supposed to delete.
However you arrived at this point, read on below to recover the files you need.
Recovering Files from Previous Versions (in File History)
The first way that you can recover files that you deleted permanently is to get back their previous versions. This is for files that you got rid of by using the “Shift + Delete” keys (or other ways). That is, if you have File History set up. If not you can skip to the next section. I suggest you should read this at some point though, so you have an easy file recovery method for next time. Click to skip to the next section.
NOTE: I strongly advise against getting in the habit of hitting the <Shift> and <Delete> keys at the same time. Files bypass the recycle bin to be permanently deleted so make it impossible to get your files back using the recycle bin recovery method. There is no great advantage to do this.
If you have File History set up, this is the easiest method that you can implement without using software. All you need to do is remember the correct name of the file that you deleted. If you don’t remember the name at first you can try with a few guesses of the name until you get it right.
Can I use File History?
File History works to recover deleted files in:
- Windows 7
- Windows 8
- and Windows 10
It is worthwhile to set up File History if you haven’t already.
It will mean next time you will be able to use this method, even if you are unable to use it this time around.
NOTE: for File History to work, you need a second or separate drive for Windows to store your versions of your files on. A network drive will do, as will a separate NAS (storage) and an external drive that is normally connected.
If you don’t have a network then you can just go with an external drive. Ideally you would attach it to your docking station if you use a laptop or tablet instead of a desktop computer.
I guess by now you can see you need to have File History already turned on to recover permanently deleted files in Windows 7 Windows 8 and Windows 10, which all have the ability to use File History. However Microsoft never supplies Windows with File History turned on out of the box (as standard).
Why doesn’t Microsoft turn on this ability to recover permanently deleted files?
It is because they can’t! The reason is Microsoft design file history to be stored separately to the main or only drive in your computer. It is a layer of safety.
Hence you need to specify a second alternate drive for File History to work. This can be on your own network (or separate external drive). You need this before Windows can save your file history. Since only you can know how you configure this for your particular situation, only you can set it up.
It sure would be nice to have that as a prompt early during installation or first few uses though!
If you’re looking for a good external drive to set this up on, you can have a look at buying an external SSD here (links open in a new tab so you can continue reading). If an SSD (external solid state drive) is not for you (they are more expensive for say a 500 Gb drive) you can get a normal external (HDD) hard disk drive here (these have much larger storage at 4 Tb and cost less, but the trade off is often size and speed).
Why am, I making such a big deal about File History? It is because File History gives us a way to recover permanently deleted files of course!
So now that we’ve given you the background on File History, if you don’t have it turned on you should consider it so in the future you can use this method on how to recover permanently deleted files in windows 7, Windows 8 or Windows 10.
We can get back to the first method to use when you need to recover permanently deleted files from ‘previous versions’ of the same file.
Here’s what you need to do to Recover your permanently deleted file using File History:
Step 1: Create a blank file with the same name
Create a new file from the same application as the deleted file and give it the same name. This can be blank as the step title suggests. Just open the application (for example Word or Excel or whatever), and from the menu select ‘FILE’ ‘Save As’.
Step 2: Open File Explorer and click ‘Restore Previous Versions’
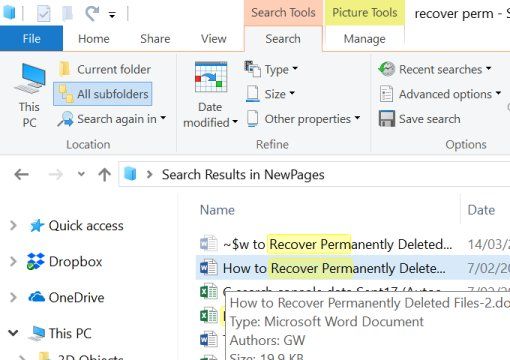
After creating the file, find it with File Explorer (you can hover over the file as per the image to check it is the right one).

Find your new file with File Explorer
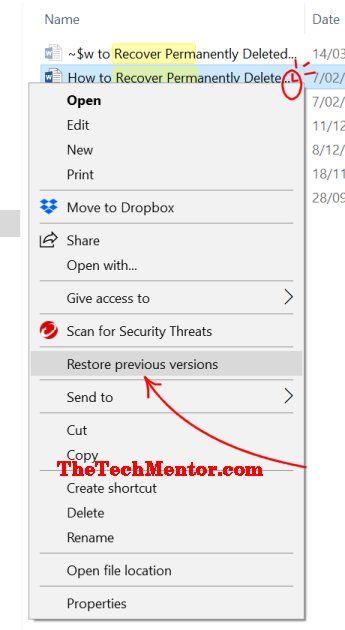
Right click on the duplicated file name and select the option to ‘Restore previous versions’ as per the screen copy below.

Right click on the file and look down the pop up menu to Restore previous versions
Step 3: Select the most recent version of your file from File History
Once you complete the previous step, Windows will search the system for any previous versions of the file that it has created via the File History system.
Once you receive a list of them, select the latest file and select the option to “Restore” and you recover your permanently deleted file (or files).
It is actually very easy to recover deleted files this way. But what if you haven’t turned on File History?
Well, then we need to resort to software to get your data back. Please remember to set up File History for next time to save yourself the trouble.
The next methods to recover permanently deleted files in Windows 7, 8 or 10 use software.
Recover Permanently Deleted Files Through Software
Using the help of third-party software or tool, you can safely recover files you deleted permanently. In the market, you’ll find plenty of options to choose from which can differ in speed and performance.
One thing they share in common is that they all save you the trouble of having to redo a lot of work after deleting some files accidentally. Same goes at other times when a bug or virus can potentially corrupt the file which can lead to problems with the opening. These data recovery tools or software can save you from getting worried by helping you recover permanently deleted files.
NOTE: One great thing to note about going to the trouble to download one of these software programs is once you have one for one issue, you then will have it in your software tool kit so can use them in future for any other unforeseen issue which might relate to recovering photos from a digital camera for USB, for example.
The first software option we cover is one we have written about before on TheTechMentor.com. No doubt it has helped many of our readers over the years.
1. Recuva
When you are looking for a reliable tool to meet your data recovery needs, Recuva tops many lists. That is because it can recover deleted files whether they were stored on your computer, hard drive, memory card, external drive or memory card. It’s safe to say that Recuva has got you covered no matter where you accidentally delete files from. The best part is that it’s free and while there are several software versions, which meet the standard of being free, they rarely come close to providing the amount of coverage.
It has some award-winning features which make it a pretty awesome option to help you recover permanently deleted files. This includes an advanced deep scan mode and display of a preview screen before complete recovery. It is able to recover your files from a damaged or even newly formatted previous version. It’s pretty much compatible with all of the Windows system software, so you don’t need to feel outdated if you’re using an old version. Here’s how to do it:
- Select the format of the file you’re trying to recover.
- Select the location of your computer from where you want to get back the file. If you aren’t sure from where you deleted it, you can choose to scan the whole computer.
- Start the scanning process; make sure to save the recovered file in a place different from where it was deleted.
Please see Casey’s article for screenshots showing how to use Recuva.
2. Stellar Data Recovery
If you want to know how well this tool operates, it’s all in the name. This is because it’s stellar when you need to recover permanently deleted files. If you accidentally deleted some files from your computer or any other connected storage device, note this one. Stellar Data Recovery will get it back for you whether you’re using a Mac or Windows PC. The software conducts a thorough scan. After that, it recovers your file without leaving you worried about any threat of getting corrupted. You can effortlessly retrieve lost files and data from your smartphone, hard drive, flash drive and memory card.
Using it doesn’t require you to remember any technical mumbo-jumbo, simply enter the name of the file you want to recover, and it’ll begin scanning. Despite extensive scans, it doesn’t compromise on speed and makes sure to deliver recovered files quickly. The application even shows you a preview of the lost file before recovering it for you. Let’s go through the steps on how you can do it:
- Choose the type of data you’re looking to recover. If you can’t remember the exact format, choose to scan through all data.
- Choose the place from where you deleted it.
- Preview the file to see if that’s the one.
- Recover it.
3. Undelete 360
Another top player in the league to recover permanently deleted files is Undelete 360 which looks so much like a traditional Windows application you can almost confuse it for one. The programmers developed it to use an algorithm that is highly efficient and thorough as well. Just like the ones mentioned before, it helps in the recovery of files. Even if they were deleted from devices like a digital camera, smartphone, memory card or hard drive.
The application includes some standard features such as previewing a file before complete recovery, a Hex viewer and a tool for data wiping. Aside from recovery of recently deleted files, Undelete 360 can recover data that existed in a wide range of formats such as DOC, JPEG, GIF, HTML, and MP3. While some users complain of slow speeds when recovering files that weren’t deleted recently, ultimately it all comes down to when you deleted the file and how much change has occurred on your computer in the meantime.
- Select from the wide range of formats the one you believe is correct for the file you lost
- Choose whether the file was deleted from the computer. If you deleted it from an external drive, name that drive.
- Check the data from the list to see if it’s the latest version
- Select “Recover”
Have a go and let us know in the comments below.
We use feedback to make our articles better for everyone.
Did you have problems using or setting up File History in Windows? Or did you find part of the software you used was confusing or didn’t work as expected to recover permanently deleted files in Windows 7, 8 or 10? Worst still, did you not succeed to recover your permanently deleted files? If so please let us know in the comments below.
Summary of How to Recover Permanently Deleted Files In 4 different ways
These ways are fast, cheap and effective, so you don’t have to compromise on any of those qualities. Restoring from a ‘previous version’ is the best if you have File History turned on in Windows 10 (or Windows 7 and 8). This does not require any third party software but it does require you to set up ‘File History’ first. Then we went through three software methods. They are some of the best ways that you can easily recover permanently deleted files without having to go to extreme measures first. More expensive measures might include consulting a professional to help recover permanently deleted files in Windows 7 or 8 or 10.


Leave A Response